Monday, June 25, 2012

Broccoli Cakes


A few years back, I had a recipe I'd keep in a steady rotation. It was simple, went well with everything, and had one of my favorite vegetables, spinach, as a main staple. I would eat it often all the time, and then in the morning I'd have the leftovers reheated for breakfast with a poached egg on top. I loved the way the spinach tasted, I loved the crunchy crust around it, I loved how I could make them in about ten minutes flat.

When I spent the summer in Texas about five years ago, I invited my friends over for supper, and I made these cakes with dinner. For some reason I turned the pan up too high, so when they arrived I promptly smoked everyone out, and managed to burn the first few. I remember eating them later, but not before we sat outside on the porch, chatting and laughing with Shiner Bocks while we waited for the apartment to be aired out. It was one of the memories that stands out of that summer: while the cakes weren't the best they could have been, it was a great story and makes me think very fondly of those good times down there.

Nowadays, I don't make the spinach cakes quite as often; since Adam doesn't eat spinach, it's not the same to make a batch, because I'd like to make sure he's not left out with stuff I like to share. It's really not a huge step back, but I haven't made something like this in several years.


Recently, I came across this post on Smitten Kitchen, one of my favorite sites to get recipes from. It was perfect; I could get my vegetable "cake" fix, and it involved a favorite vegetable for both of us, broccoli. An extra added bonus, it was very simple to get together. I chopped the broccoli up this morning before work and then got to work putting everything together and frying it up tonight with dinner (a fish recipe I'll post later). It was even better because I got to use up some pent-up frustrations with a potato masher, so that helped too!


All in all, this was very tasty as a side. I wish I'd cooked it *just* a bit longer to get it crunchier, and next time I'll have to double it so I can get more out of them and eat them with my poached eggs in the morning, but we were both very happy with the way that they turned out. Now, maybe I can have new memories associated with the broccoli cakes as much as I do with the spinach ones.


Broccoli Cakes (recipe from Smitten Kitchen)

Roughly 3 cups chopped fresh broccoli florets (try not to cut too small-make sure that the florets are large enough to be able to mash!)
1 egg
1/2 c. flour
1/3 c. grated parmesan cheese
1 tsp. minced garlic
1/2 tsp. salt
Pinch of red pepper flakes
Pinch of black pepper
2-3 Tbsp. olive oil


Steam broccoli in a medium sized pot with about a half-inch or so of water on the bottom and the broccoli placed directly in the water. Steam, covered, for about 5 and a half minutes. Drain well, then set aside to cool down slightly.

In a bowl, beat the egg. Add the remaining ingredients and mix together. Then, add the (semi-cooled) broccoli and mash the entire mixture with a potato masher, but only slightly. Make sure the broccoli isn't mashed too small and that the bits are recognizable when put together in a patty.

Heat a large skillet over the stovetop and then add the oil. Once hot enough, drop batter about the size of your palm into the pan. Fry each side about 2-3 minutes, or until each side is golden brown.

Drain cakes on a paper-towel lined plate and serve up immediately.

Wednesday, June 20, 2012

Mushroom Stroganoff


The temperature in Boston today hovered between 92 and 100 degrees today. In my car, the temperature gauge went from 103 to 105 and then back down to 100. What it actually was is anyone's guess, but no one is denying the obvious: it was hot today.

So of course, what's a girl to do but make a dish typically seen in colder weather: mushroom stroganoff. I'm not sure why, but I have been craving pasta recently, and trying to figure out the best way in which to get my fix. On Sunday morning, I was watching TV while drinking my morning coffee, and a show that I haven't seen in awhile came on, called "The Best Thing I Ever Made" (on Food Network, obviously). One of the dishes I saw on there was mushroom stroganoff, and I was hooked. I had to do it. Every now and then I'd see beef stroganoff in the store, and I wanted to get it but for some reason always talked myself out of it. This seemed like a pretty decent compromise-and it wasn't even as bad for you as the original recipe! After looking at the recipe it also seemed like I could get it done pretty quickly too, which was a huge plus. Add to that I had nearly everything needed for the recipe except the mushrooms, and I was sold.

Unfortunately, my stomach today was all, "pasta! Now!" while my body was all. "Too hot. Need water and melon.". Cooking this meal didn't seem like the brightest idea at this temperature, until I remembered one thing: I now live in a home with central air. It could be 3,000 degrees outside and I'd be cool as a cucumber in the house. So I went to the store after work, picked up some portabella caps, and came home to get started.


This was very quick to throw together: slice the mushrooms, let them saute, cook the noodles, and make a sauce in the pan. Really no big deal. I was pretty excited too-the recipe called for sour cream and goat cheese. I had plenty of goat cheese leftover from that tart I posted about yesterday, and I had a whole boatload of greek yogurt, which is pretty similar to sour cream and I have it in the fridge more often than sour cream anyway. It took about a half hour, maybe 45 minutes, tops. Most of that time was just waiting-it's very low-effort, as meals go.


I do think the end result was tasty, but it was probably missing a bit more of salt and pepper-it was a little on the bland side for me. On "The Best Thing I Ever Made", one of the things I heard was that this dish tasted just like beef stroganoff. I don't necessarily agree-it tasted like mushrooms. But it was still pretty decent. I ate it with some wilted kale on the side, since I need to use enough of the CSA share from last week to make room for our next share tomorrow. I could definitely taste the goat cheese (I used a bit extra than the recipe called for) and the mushrooms were nice and tender, just the way I like them. Dare I say that this recipe might even be improved by a bit of bacon? But I may say that only because I think bacon makes everything taste better. :)

Mushroom Stroganoff (recipe obtained from foodnetwork.com)

12 oz extra-wide egg noodles (I used whole wheat wide noodles-kind of like egg noodles in shape)
3 Tbsp. butter
5 portabella mushroom caps, sliced
1 tsp. salt
1 bunch green onions, sliced
1 Tbsp. flour
14 oz. beef broth
8 oz. sour cream (I used plain greek yogurt instead)
4 oz. fresh goat cheese (I used crumbled goat cheese instead of a log)
1/2 tsp. pepper

Add the noodles to cold water in a large pot (enough to cover the noodles). Turn the heat to high and cook 18 to 22 minutes, stirring every so often.

Melt the butter in a large pan set over medium-high heat. Increase the heat to high, add the mushrooms and sprinkle with salt. Saute for about 5 to 6 minutes or until the mushrooms have softened a bit and released their juices. Add the white bottoms of the green onions (sliced!) and saute 2 to 3 minutes more.

Sprinkle in the flour and cook about 1 minute, creating a bit of a roux. Add the beef broth and bring everything to a simmer. Cook for about 10 to 12 minutes, and then add the sour cream (greek yogurt), goat cheese and black pepper. Stir to combine and warm through, about 2 to 4 minutes.

Drain the noodles, add to the pan and stir to combine. Garnish with the green onion tops if you desire and additional black pepper if you want it. Serve immediately.

Tuesday, June 19, 2012

Beet Tart with Goat Cheese and Walnuts


We got our first CSA share last week. Adam and I have been really excited for the share to start, since we'll get a ton of good, fresh veggies out of it, and we'll get the opportunity to try new things that we might not otherwise.


The one thing I was wondering whether or not we'd get was beets. Beets, for me, are kind of the bastard stepchild of the veggie world (or is it a fruit? Those weird veggie/fruit things sometimes confuse me.). I'm not really sure what to do with them. I remember having them once years and years ago, but they weren't all that memorable. My most recent memory of them is my grandmother's potato salad, which was really store-bought potato salad with a can of diced cooked beets. To me, the taste of them is kind of nondescript. I don't crave beets and I'm really indifferent about them in general. So of course we got some, and to see them lying in the fridge kind of intimidated me.

But as they say, when in Rome, you make lemonade out of lemons, or something like that.


I began to hunt around for ideas. One friend told me to roast them, peel them, and eat them as is. I found a bunch of recipes that said to do the same thing. I liked the idea of the simplicity of it, but I really wanted to do something different. I found this recipe on epicurious (a site that I really should frequent more often) and thought I'd give it a whirl. I decided to use store bought pie crust though, since I just didn't have the energy to make a tart dough and besides, we didn't have any dried beans to weight it anyway. I also bought crumbled goat cheese instead of a log to make it easier to spread around. The recipe told me that when I was peeling and chopping the cooked beet to be careful, because beets stain EVERYTHING. It's true-and as I sliced my finger on the peeler it was hard to determine what was beet juice and what was blood (not to worry, nothing was tainted). But my hands were stained for at least a day.


Don't worry, I'm fine. Got a good nick with a vegetable peeler, but I used the closest thing I could find to cover it up.


The tart itself though? Not too bad. I'd definitely make it again (if someone decided to give me some beets) and although I've been eating it as my lunch the past few days I think this would really go well with some grilled chicken or something. I was pretty happy with the results. It was tart (ha! Pun intended!) and the crust was nice and flaky against the beet and onion filling (never you mind that it was store bought. It's a well known fact that I hate making my own dough). I could have probably cooked them for about ten minutes longer to take away a bit more of the bite, but I liked the twang I got from the beets and the goat cheese, and I really liked the texture of the chopped walnuts. I'm especially happy that I tried something I normally never would and I wasn't disappointed.


Next week in the CSA though? I'm hoping for tomatoes. :)

Fresh Goat Cheese, Roasted Beet, and Walnut Tart (recipe from epicurious.com)

2 to 3 small beets (I used 4 medium sized ones)
1 Tbsp. olive oil
salt and pepper
1 Tbsp. unsalted butter
1 medium onion, thinly sliced
2 tablespoons dry white wine (I actually had none in the house-don't judge, it was a long week at work last week!-so I omitted this step)
1 recipe tart dough (found here) , shaped and blind-baked according to the directions (I took a shortcut and used store-bought pie crust, not blind-baked-use whatever your heart desires, but I quite enjoyed the pie crust!)
3 large eggs
3/4 c. heavy cream
4 oz. goat cheese (I used crumbled goat cheese, which worked really well)
1 c. chopped walnuts
1 Tbsp walnut oil (optional-I had none, so I left it out)
About 2 Tbsp. chopped fresh parsley (I actually always forget about parsley and I think there's not much taste to it anyway, so I had none and left that out too)

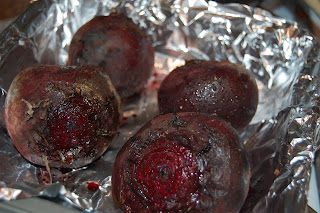
Preheat the oven to 350°F. Rinse the beets well and dry them with a paper towel. Place the beets in a small pan (a square brownie tin worked well for me), and season with the olive oil and the salt and pepper. Cover the pan with aluminum foil. Bake about 1 hour, when you can easily pierce the beets with a knife.

Let the beets cool (quick cool tip? Put them in the fridge for about ten minutes). Peel the beets and chop roughly, into medium sized pieces. Watch out where you do this, as beets really do stain everything. I decided to dice them on a foil wrapped cutting board to make for easier clean up and less chance to dye my kitchen counter and my cutting boards. My hands, however, stayed a slight shade of pink for a day and a half.

Saute the onion in a pan with the melted butter until the onions are soft and cooked through-about 5-7 minutes. If they wind up slightly caramelized, not to worry! Add the white wine and cook out for another minute, deglazing the pan in the process. If you have no wine, you can either leave it be or add some chicken stock.

Mix the beets and onions together and put them into the pie shell.Whisk the eggs and cream together and season well with salt and pepper. Add the egg mixture to the beet and onion mixture in the pie shell, making sure to make things even in the pie plate. Sprinkle the crumbled goat cheese all over the top of the tart. Bake for 20 minutes at 350 degrees, then remove and sprinkle the chopped walnuts on top of the tart and drizzle the walnut oil over it, if using. Return the tart to the oven and bake for an additional 15 to 20 minutes or until it's just been set. If using parsley, sprinkle on top after removing from the oven and before serving, but really, it's not imperative that you use it. If you're eating as a main dish, it would be great with a nice simple salad, but as a side, it would be perfect with some chicken. Epicurious recommends using pork as well.

Saturday, June 16, 2012

Oreo balls

I'll admit that I have few pictures of this recipe. Next time, I'll remember to take more and add them here; but for now, you'll have to use your imagination. :)

Don't mind the name of this recipe. Feel free to call it what you wish, but oreo balls, like fat pie, just sticks in my head. Be forewarned, though: depending on who you're with, oreo balls can turn into a very R-rated recipe. Really fast. I've heard them called salty balls (they're not), chocolate balls, big balls, little balls, and my personal favorite, simply "balls". I'm related to and friends with lots of people who like to make jokes about balls. It's partly why I like to hang with them.

Anyway.

I usually make this recipe at Christmastime. It's rich, comforting, and the perfect gift to make for people when you are very short on time. I will generally give it out in half-dozen increments, and one year I heard from one friend who had gotten such a gift of oreo balls, ate them in one sitting, and then got herself sick because they were so rich (I advise eating one a day, not one an hour. Listen to my advice, people.). I will continue to make them every year for fear of mutiny otherwise. What is funny, though, is how easy they are. Start to finish, the whole process takes about an hour total (not counting setting time). Aside from the melting of the chocolate, there's absolutely no baking involved (a big plus sometimes!). Yet, they still get rave reviews. I think the simplest recipes get the highest praise, honestly.

I recently made these again, but this time the occasion was a wedding. Two good friends of mine just got married, and I was asked to make oreo balls as part of the hotel welcome baskets-I was honored to do such a task but also slightly worried-where was I going to store 180 oreo balls? A lot of you guys have seen my fridge, right? I'm lucky I had room to put the cream cheese in there! Several creative meals later I had enough space to store them, but I had to pack it carefully: a batch would be made and frozen on a single layer in the freezer. Then, the next day I'd pack them in a large freezer bag two layers deep and do the process over again, with the tray holding the single layer on the top. Dipping them was even more tricky: I wanted to make sure that the balls didn't stick to each other, so I'd also do those in shifts. Finally, they got bagged and were carefully stored in the freezer until they made their way into the welcome bags. A long process, sure, but completely worth it. It was also made easier by knowing that the other occupant of my house is not a chocolate fan, so I didn't have to worry about having one pilfered here and there. People came up to me and told me that they ate them in one sitting while others told me how they rationed them out so that there would be enough to last the whole weekend. I'm happy they were enjoyed (and, I'll admit, happy to have the space back in my freezer!), but more happy that I got to share in such a joyous occasion-I'm so happy for my two friends, and they threw one hell of a party.

This recipe will get you gigantic points all the time. They're small enough to pop right in your mouth, but not too sweet. Rich, but unless you eat the entire batch on your own, not overly so. They're also easy to modify-I've made them using peanut butter oreos, mint oreos, and double chocolate. I know there's strawberry and other random flavors, but those don't sound as good to me. I've dipped them in dark chocolate, mint chocolate, peanut butter chocolate, and white chocolate before. If anyone ever ask you how to make them, try to do some elaborate story though-it sounds so much better than saying it's crushed oreos and cream cheese, but I'm not that creative to make something up, and plus my memory sucks enough that I'd probably have about 16 different stories out there.

Oreo balls (recipe origin unknown)
1 package of oreos
1 block of cream cheese (if you're looking to go "health-conscious" on this-and to be honest, I'm not sure why you'd want to since this is very much an indulgent dessert-you can get neufchatel cheese. Your oreo balls will come out much better and will be much easier to work with if you use the real stuff, but I have used both and found no difference in taste)
1 12 ounce bag of chocolate chips of your choice (for traditional oreo balls I use milk chocolate)
1 tablespoon of crisco

Put the cream cheese on the counter to allow to come to room temperature or at least close to room temperature.
Crush the oreos in a food processor or blender (if you do it in a blender, crush the oreos one sleeve at a time; in a food processor, throw the whole package in). Make sure the oreo crumbs are fine, nearly the consistency of coffee grounds. Put into a large mixing bowl.
Add the cream cheese, and make sure the oreos and cream cheese are fully mixed together (you can use a spoon, but I recommend getting down and dirty and using your hands, and yes, I saw the double entendre in that phrase too).
Form balls roughly the size of walnuts or slightly smaller, depending on how many you need to make. I've found I can get about 45 from one batch. Place them in a single layer on a cookie sheet lined with wax paper either in the fridge or freezer (These are perfect to make long ahead of time and freeze until you're ready to dip them). Freeze overnight, preferably, before you dip them.

To make the melted chocolate, place the chocolate chips in a double boiler (if you don't have one, a pot with about an inch and a half of water and a heat-safe bowl on top, big enough so it doesn't touch the bottom of the pot, will do just fine) and melt with one tablespoon of crisco over medium low to medium heat. When fully melted, dip the balls so that each one is fully covered in chocolate. Put back in the fridge or freezer to fully set.